
Is there anything worse in gaming than knowing you can do something, but not being able to do it? That's where I am with Colossal Cave Adventure II: I've found all twenty of the treasures, and I'm pretty sure that I've worked out all of the puzzles, but I can't put it all together in a single run. I'm so close to finishing the game, and yet I can't quite get there.
Oddly for an adventure game, the problem I'm finding myself in has nothing to do with any of the puzzles. Instead, the problem is a logistical one: my lamp runs out of power before I can find everything. I could recharge it with a battery from the vending machine, but that requires sacrificing the gold coins, and you can't beat the game without all twenty treasures. I've had a few attempts, but so far I haven't been able to put together an optimal run. I know how to do everything I need to win, I just don't know how to do it efficiently enough. It's bloody frustrating.
I could continue to make attempts until I eventually luck into a successful run, but the smarter option is for me to sit down and write up a walk-through. If I plan out my run and write it out in advance, I'll know that I can definitely do it within the required number of moves. I'm pretty sure that the lamp lasts for 390 moves, so I have an upper limit. The real trick is going to be avoiding the game's random elements: being murdered by dwarves, having my stuff stolen by the pirate, or drowning in the sewer maze are all factors that could throw off a successful run. I'll need to leave myself some leeway to account for them.
That's for another time, though. For now, I'll run through all of the treasures, and how I acquired them. First, here's a quick run-down of the treasures found in the original Colossal Cave Adventure:
- Gold Nugget (found near the entrance; can only be removed by using the PLUGH password to teleport)
- Diamonds (unguarded)
- Gold Coins (unguarded)
- Jewelry (unguarded)
- Bars of Silver (unguarded)
- Ming Vase (unguarded, but you need to drop it on a pillow or it will break)
- Persian Rug (under a dragon, which you have to kill with your bare hands)
- Golden Eggs (found at the top of a beanstalk, and can be used to pay a Troll who is guarding a bridge; saying FEE FIE FOE FOO returns them to their original location)
- Trident (at the top of the beanstalk, behind a door that need to be oiled before it will open)
- Pearl (inside a clam that can only be opened with the Trident)
- Emerald (in the Plover Room; can only be retrieved by passing through a narrow passage while carrying nothing except the Emerald)
- Platinum Pyramid (in a dark room just off the Plover Room; can only be retrieved by using the PLOVER password to teleport in)
- Rare Spices (found on the far side of the Troll bridge)
- Golden Chain (found around the neck of a bear, which must be placated with food, then used to defeat the Troll)
- Pirate's Chest (found deep in the maze with passages "all alike")
Colossal Cave Adventure II adds five new treasures to the game. I'll run through them one by one.
Ivory Tusk: The tusk is found in an area just off a series of tunnels that are described as "unsafe". (I think that's just flavour text, as the tunnels never posed any actual danger to me.) To reach the tusk I needed to pass through a narrow tunnel, through which I could only take my lamp. Of course, I wasn't able to go back that way carrying the tusk, so I needed another way out.
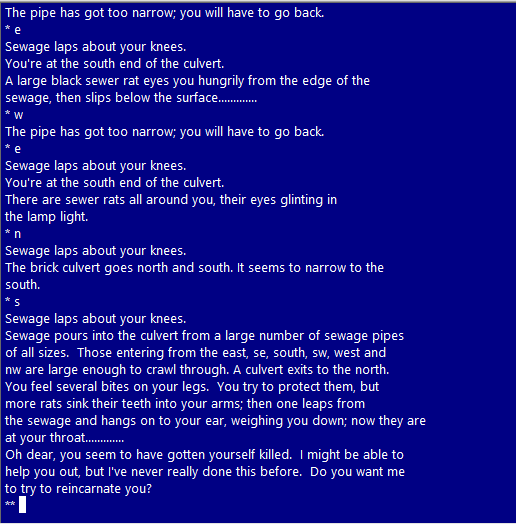
In the room is a steep tunnel that's submerged by churning, filthy water. I mentioned it in my last post; when I had tried to enter I drowned in sewage. Upon further investigation I discovered that the water ebbs and flows with the tide, and when the tide was low I was able to enter a maze-like sewer system. Obviously, this was the way out.
It wasn't easy though, because this place is a deathtrap. The maze isn't large, but it took me a long time to map simply because it's so dangerous. The tide that I mentioned earlier is one of the deadly factors; when it rises the entire maze is flooded, which kills you instantly. The other thing to watch out for is a horde of rats, which will swarm up out of the water and gnaw you to death. I don't mind dying in adventure games (indeed, there are some games where it's my favourite part) but I don't think it should ever happen randomly. I could be missing some way of avoiding death here, but if not I think it's bad game design. (On further inspection, it seems that both of these factors aren't random, but are instead on a timer. That's not as bad, but it's still unwelcome.)
 |
| Death by sewer rat |
Despite many inglorious sewage-ridden deaths, I found the exit and escaped to the Bedquilt area. What a relief.
Crystal Orb: This orb is found in a room near the basement of the chapel. There entrance has a warning sign that says "Wizards Only", but signs are no deterrent to a real adventurer. When you go in a slab covers the only exit, and there is seemingly no way to open it. Taking the orb is no problem, but there's no way to get it out. I bashed my head against this puzzle for a while, until I decided on a whim to drop the orb. As soon as I did so, a grey-robed wizard appeared and teleported me to another location, along with the orb. I was convinced that this was too easy, and that I had somehow missed something, but as far as I can tell this is the actual solution. It barely counts as a puzzle at all.
 |
| I wish more games had wizards that could solve all the puzzles for me |
Chalice: There's a strange man who pops out of the shadows occasionally to give cryptic hints. One of those hints is about the chalice, which he say has strange powers. I'm not sure what those powers are (perhaps they play into the endgame), but at least he gives a hint about the existence of this hidden treasure.
Not that it's very well hidden. When you enter the chapel there's a rope hanging from a ceiling beam. Climb the rope, and the chalice is sitting on a beam at the top. It couldn't get much easier than that, really.
 |
Crown: Also near the chapel is an area called the Thieves' Den. It features a hook with a loot bag and a black mask, both out of reach. It also features a crown, which can be taken without trouble. I thought the chalice was easy to get, but this was even simpler.
 |
| My attempt to get a screen-grab is jeopardised by a hostile dwarf |
Ruby: This treasure was the most difficult to obtain, and I only really did so by accident. There are two puzzles that need to be solved to find the ruby. The first involves the giant. I mentioned him in the last post: he hangs around in the Living Quarters, and if you go in there he snatches you up and puts you in his dungeon before eventually eating you. I never figured out how to escape from his dungeon, but as it turns out you don't have to.
Th trick is to have the golden eggs on you when you enter the Living Room. If you do, the giant grabs them and starts eating them. It's not really logical that eggs made of gold would be edible, but logic is rarely your friend in early adventure games. I was lucky enough to be carrying the eggs on one of the occasions I decided to tackle the giant, otherwise I'd still be trying to figure out a solution.
 |
| Eating eggs while reclining on a couch? It's a disaster waiting to happen. |
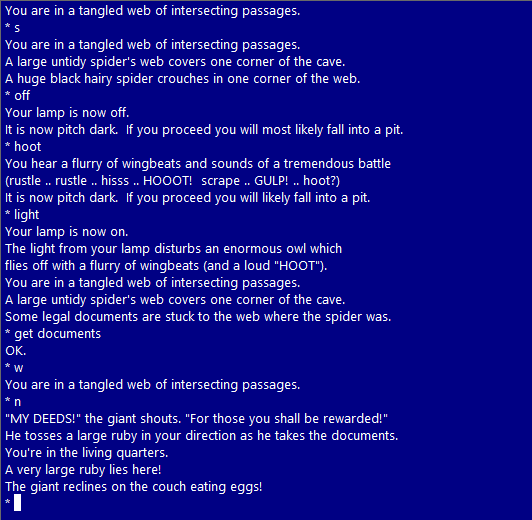
The second part of the puzzle involves the web maze that I mentioned last time. (There are four distinct mazes in this game! Bloody sadists.) You can enter this maze from the giant's Living Room. The only thing of interest in there is a giant spider. It doesn't pose a danger to you, but you can't kill it either. I tried setting fire to its webs, I tried throwing the axe at it, and I tried using the trident, but none of it worked. The solution? I needed an owl.
In the areas surrounding the chapel there's an owl who flaps away when you approach it. You can summon him by saying HOOT, but he won't stick around unless your lamp is turned off. I had thought he would be useful in defeating the giant, but I was wrong. The owl is used to kill the spider, which I only figured out by going through all of my items and notes and trying everything. I thought he could only be summoned near the chapel, but nope, he's more than willing to fly into the web maze.
It turns out that there are some legal documents in the spider's web, which I was not expecting. Said documents belong to the giant, and when you go back through his area while carrying them he rewards you with a ruby. Job done! After that it's a simple FEE FIE FOE FUM to get the golden eggs back, and move on to the endgame.
 |
| That questioning "hoot?" at the end sounds suspiciously like an owl being poisoned by a spider from the inside. |
Or I would be moving on to the endgame, if I could retrieve all the treasures in a single shot. I should have the game done by next week, if I can draft an effective plan of action. And if the dwarves don't get me. And if I don't die of thirst, or get eaten by rats, or have my treasure stolen by the pirate at a bad time, or drown in sewage. Adventuring: it's a rough old time. Wish me luck!
No comments:
Post a Comment